Record metadata on Kubeflow from Notebooks
Demonstration of how lineage tracking works


Lineage Tracking
- This blog post will first guide you through the metadata SDK API, to create a notebook and log several actions to the metadata DB. Afterwards, you will be able to navigate to the Kubeflow UI and the resulting lineage graph, which gives you a graphical representation of the dependencies between the objects you logged using the SDK.
!pip install kubeflow-metadata --user
# Install other packages:
!pip install pandas --user
# Then restart the Notebook kernel.
import pandas
from kubeflow.metadata import metadata
from datetime import datetime
from uuid import uuid4
METADATA_STORE_HOST = "metadata-grpc-service.kubeflow" # default DNS of Kubeflow Metadata gRPC serivce.
METADATA_STORE_PORT = 8080
ws1 = metadata.Workspace(
    # Connect to metadata service in namespace kubeflow in k8s cluster.
    store=metadata.Store(grpc_host=METADATA_STORE_HOST, grpc_port=METADATA_STORE_PORT),
    name="xgboost-synthetic",
    description="workspace for xgboost-synthetic artifacts and executions",
    labels={"n1": "v1"})
r = metadata.Run(
    workspace=ws1,
    name="xgboost-synthetic-faring-run" + datetime.utcnow().isoformat("T") ,
    description="a notebook run",
)
Create an execution in a run
- An Execution is a specific instance of a run, and you can bind specific input/output artifacts to this instance. Execution also serves as object for logging artifacts as its input or output
exec = metadata.Execution(
    name = "execution" + datetime.utcnow().isoformat("T") ,
    workspace=ws1,
    run=r,
    description="execution for training xgboost-synthetic",
)
print("An execution was created with id %s" % exec.id)
Log a data set and a model
- A Log_input log an artifact as an input of this execution. Here exec.log_input accept an artifact class as an argument, a DataSet is an artifact. Every artifacts has different paramenters such as name, uri, query. The way to create DataSet artifact is calling ready-to-use APIs metadata.DataSet and provide arguments
date_set_version = "data_set_version_" + str(uuid4())
data_set = exec.log_input(
        metadata.DataSet(
            description="xgboost synthetic data",
            name="synthetic-data",
            owner="someone@kubeflow.org",
            uri="file://path/to/dataset",
            version="v1.0.0",
            query="SELECT * FROM mytable"))
print("Data set id is {0.id} with version '{0.version}'".format(data_set))
- A Log_output log an artifact as a output of this execution. Here exec.log_output accept an artifact class as an argument, a Model is an artifact. Every artifacts has different paramenters such as name, uri, hyperparameters. The way to create Model artifact is calling ready-to-use APIs metadata.Model and provide arguments
model_version = "model_version_" + str(uuid4())
model = exec.log_output(
    metadata.Model(
            name="MNIST",
            description="model to recognize handwritten digits",
            owner="someone@kubeflow.org",
            uri="gcs://my-bucket/mnist",
            model_type="neural network",
            training_framework={
                "name": "tensorflow",
                "version": "v1.0"
            },
            hyperparameters={
                "learning_rate": 0.5,
                "layers": [10, 3, 1],
                "early_stop": True
            },
            version=model_version,
            labels={"mylabel": "l1"}))
print(model)
print("\nModel id is {0.id} and version is {0.version}".format(model))
Log the evaluation of a model
- Metrics captures an evaluation metrics of a model on a data set
metrics = exec.log_output(
    metadata.Metrics(
            name="MNIST-evaluation",
            description="validating the MNIST model to recognize handwritten digits",
            owner="someone@kubeflow.org",
            uri="gcs://my-bucket/mnist-eval.csv",
            data_set_id=str(data_set.id),
            model_id=str(model.id),
            metrics_type=metadata.Metrics.VALIDATION,
            values={"accuracy": 0.95},
            labels={"mylabel": "l1"}))
print("Metrics id is %s" % metrics.id)
serving_application = metadata.Execution(
    name="serving model",
    workspace=ws1,
    description="an execution to represent model serving component",
)
# Noticed we use model name, version, uri to uniquely identify existing model.
served_model = metadata.Model(
    name="MNIST",
    uri="gcs://my-bucket/mnist",
    version=model.version,
)
m=serving_application.log_input(served_model)
print("Found the mode with id {0.id} and version '{0.version}'.".format(m))
Plot the lineage graph
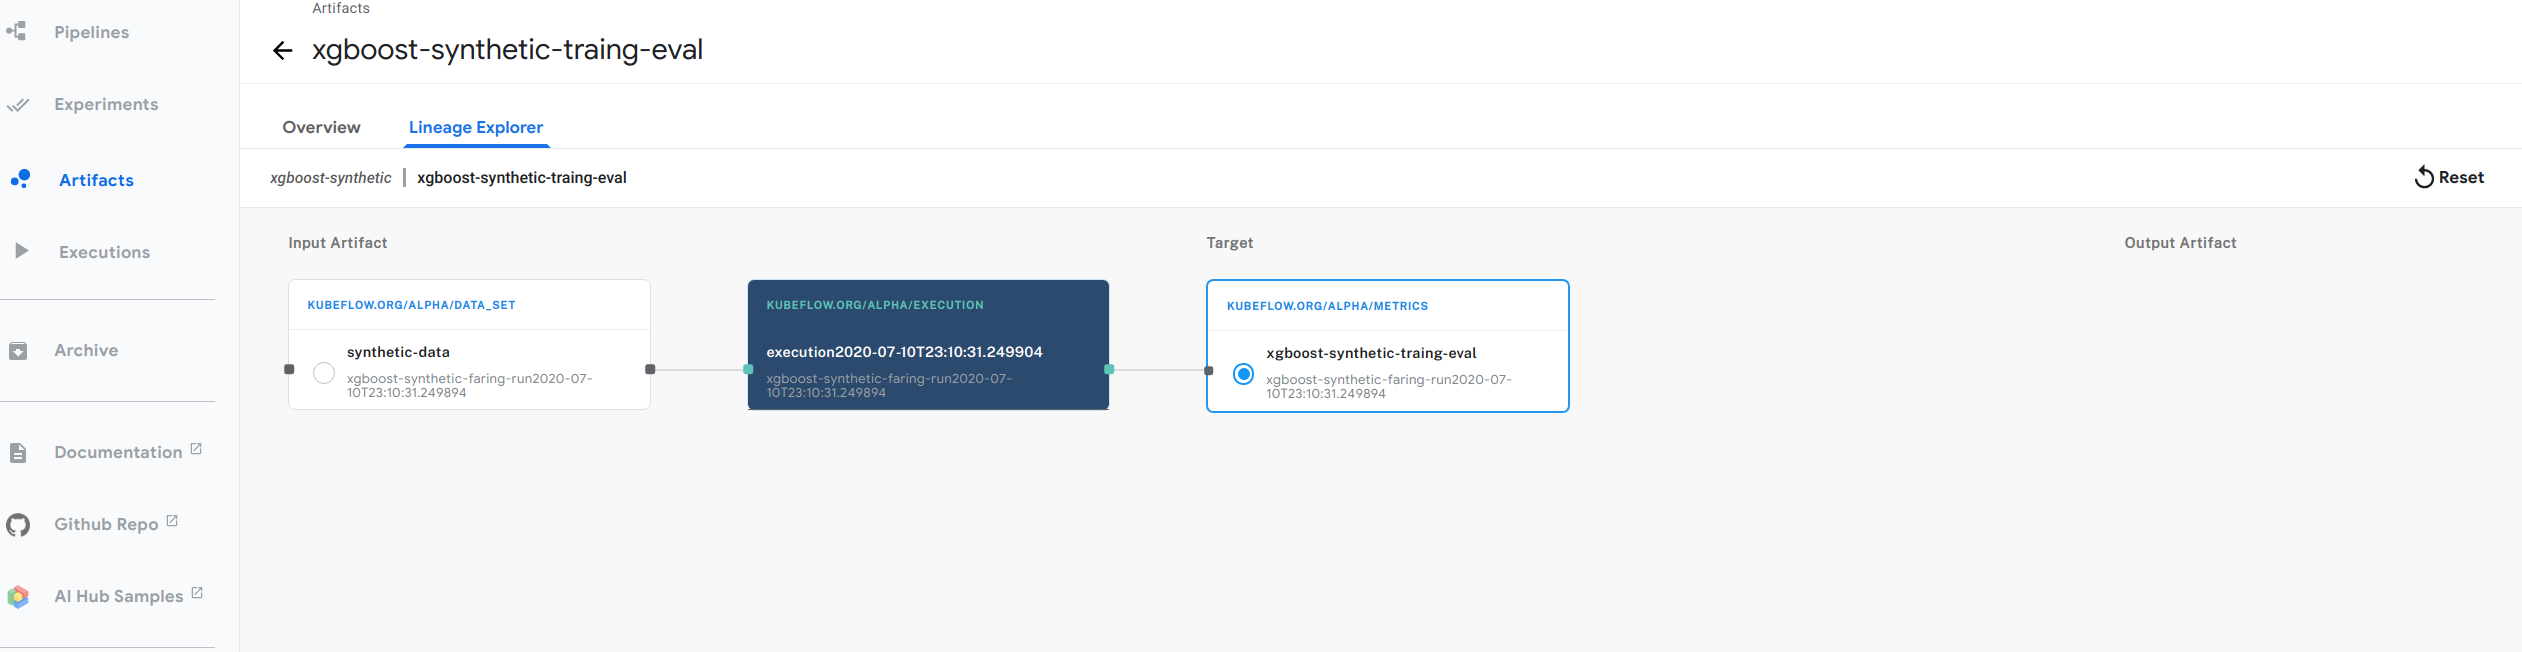
- The figure above shows an example of the lineage graph from our xgboost example. Follow below steps for you to try out:
- Follow the guide to setting up your Jupyter notebooks in Kubeflow
- Go back to your Jupyter notebook server in the Kubeflow UI. (If you’ve moved away from the notebooks section in Kubeflow, click Notebook Servers in the left-hand navigation panel to get back there.)
- In the Jupyter notebook UI, click Upload and follow the prompts to upload the xgboost example notebook.
- Click the notebook name (build-train-deploy.ipynb.ipynb) to open the notebook in your Kubeflow cluster.
- Run the steps in the notebook to install and use the Metadata SDK.
- Click Artifact Store in the left-hand navigation panel on the Kubeflow UI.
- Select Pipelines -> Artifacts
- Navigate to xgboost-synthetic-traing-eval
- Click on Lineage explorer